Ready to hit the ground running and start a profitable blog from scratch?! I got you!
Your Content
Here's the truth: we only do things we want to do. Of course, we do the things we have to do, but if you want to consistently become better at something and even profit from it, you have to have two things: Passion and Purpose.
You'll hear me say that again, because I think it's SO important. Because if you don't have those when you start your blog, chances are you won't continue doing it.
With that said, many “experts” and “gurus” will tell you that need a niche in order to start a profitable blog. A “Niche Blog” refers to creating a blog for a specific and targeted market. This is a blog that focuses solely on one topic. For example, a blog that focuses on digital photography. Or, a women’s maternity fashion blog. Or, a cooking blog with gluten-free recipes. And I say HELL NO! If that's something you really want to do and will excel at it, go for it. But if you're like me, and you like talking about different aspects of your life, then I say skip it. You do not need a niche to be successful.
When you first start out blogging it’s not always easy to pick a path. You might be talking about one subject or another and you might feel cornered (not to mention stressed) to pick one blog topic only. What if you change your mind or no longer feel passionate about the subject? Then, you feel trapped to keep up a blog that no longer has meaning to you.
Think, for a second, of any of the radio shows or talk shows or morning news programs that you listen to. Do they always stay on one subject ONLY?
NO!
And do you know why? Because they are constantly using interesting, top-of-mind news and content that’s interesting to the viewer. They seamlessly switch from subject to subject, keeping us engaged the whole time. You are allowed to do that too.
Here is my advice:
Blog about a few key subjects you are passionate about and/or an expert in and make your articles really enticing! That's it. Really. It doesn't have to be something vastly different from everyone else. It just needs to be something you love and can make interesting to others.
The BEST thing about a blog is you choose what it's about. That means it can change and morph over time.
Write down these ideas, then think about some of the post topics you can write about. But don't just stop there. Think about what the post titles might even be. And remember, think a little differently. Instead of writing, “Grilled Cheese Recipe”, Instead concoct something a little bit out of the box, and something someone has written 35 times over. So instead, “45 Ways to Make the Best Grilled Cheese”.
Build it
First, you need a website. I have tried them all: Blogger, Squarespace, and WordPress (and a few in between) and I feel that WordPress is the best bet for a beautiful, seamless, and easy to use blog.
It’s very easy to change the design, focus, or add and remove tools that you need. You can read my comparison of all three here. Since switching to WordPress, I just feel like processes are much much easier. I also love my design and you can’t beat the plugins (here are all the tools I use for my blog.)
So, what is a “lifestyle” blog?
A lifestyle blog is one that focuses on a myriad of subjects. You don’t necessarily stick to one niche, you blog about multiple subjects. Lots of people have said this doesn’t work as a profitable blog but I can tell you they are just plain wrong. As long as you are creating valuable content and you have focus (meaning you pick a few subjects to delve into that can range from your life to travel to blogging to health to everything in between) you can succeed.
It can be defined as, “A lifestyle blogger creates content inspired and curated from their personal interests and daily activities.” – Media Kix. It’s a website primarily focusing on the blogger’s life and is the extension of the writer, herself (or himself of course!).
There are a lot of ways to go about this, but the general idea for a lifestyle blog is one that follows you as a person. Therefore, you are the brand. You control the content and you create the rules. Pretty awesome, right?
How do you start a lifestyle blog from scratch?
Click here to start a blog on WordPress, then follow the step-by-step instructions below to learn how.
If you’re like me, you want to start a blog cheaply, but you also want customer support. SiteGround is the answer, no question. You can chat with them day and night if you ever have any issues or need support. I am blown away by the service and support I receive. Oh, and plans start at just $3.95 a month, which is the cheapest out there!
While I know $3.95 is an expense, this is guaranteeing that you own your content, and you’re able to easily make this back. Also, you get a FREE domain name. That means your “.com” is totally free! That would be an added expense with any free site like Blogger. I believe you do need to spend just a small amount in order to make money. And that’s what this guide is here for! Through blogging I am able to travel around the world and do things I never thought possible. Blogging has opened so many doors for me, and I wish I would have known about these secrets first, so that I could have started a profitable blog from the start.
You can start a blog on free platforms like Blogger but here’s the deal: you don’t own your content. And worse still, if something goes awry with your blog, there is nothing that can help you. A writer recently lost decades of work when his site crashed. The problem with Blogger is that you don’t have control over your site. So while you may think you want the cheaper option, I guarantee using WordPress will save you time and hassle.
Yes, there are other web hosting companies out there. But you want one that will be the fastest and have the most support. Here are the facts about SiteGround:
- Loads faster than all other web hosts. This is EXTREMELY important. Let’s say someone new comes to your site- but it doesn’t load. They click away immediately!
- Free domain name. No need to purchase that $14 GoDaddy “.com” for an additional fee.
- Hack protection. You also have to play it safe with your site. SiteGround has built in security to make sure no one messes with your site. SiteGround were the pioneers in applying effective account isolation mechanisms to the shared hosting environment.
- Website caching is automatic. When your site starts getting some LOTS of traffic, caching is a must (basically refreshing the page to show what’s new). No host can handle a spike without it. They do the caching for you. Meaning, you don’t even have to worry or think about it.
- Free site transfer. Are you on another site like Blogger or Squarespace (like I was?!) good news. They transfer your site for you. And they take the headache out of it. Y’all, people pay upwards of $500 for site transfers. For real.
- They’ve been around the block for over 10 years. They are here to stay.
- Backups. They back up your site on the regular to make sure that all your content is safe.
- But my favorite feature is the support. I can chat with knowledgeable support and fix your problem in 5 minutes or less. I can’t tell you the number of sleepless hours this saved me (and believe me, I spent many up working on Blogger issues.)
- Here’s the biggest thing… it’s so cool I almost don’t want to tell you…but I will! If you have an issue with your WordPress site, not even SiteGround, they will help you. BOOM.
- There are REAL PEOPLE answering your questions round the clock.
Now that you know the ins and outs of hosting, you are ready to go and start a profitable blog.
First, click here to get this crazy good deal on hosting (before this price goes away!).
Okay, now that we’ve talked about the pros and cons, let’s start the blog. Here are the step by step instructions:
Step 1: Register Your Domain
The first step is to pick your domain name. Meaning, what do you want your www.yourblogurl.com to be? This can be difficult, but I recommend picking something totally aligned to you. Usually, it’s a good idea to use your own name or something that relates back to what you might be writing about.
Some tips for picking your domain name should be short or simple enough that people can remember it. After all, this is what people will type in their browser, so keep it easy!
If you don’t want to use your name, make it relate back to what topics you’ll focus on or what you are passionate about.
Okay, now that you have a domain name, let’s get to business!
Step 2: Choose Your Hosting Plan
Click here to grab your hosting and domain name for just $3.95 with SiteGround. Click “choose a plan” then select a plan that works for you.
A note about plans: If you are just starting out, go with StartUp. If you have been blogging for a while I'd go with GrowBig. If you are fairly well established and have over 50,000 page views per month, I'd go with GoGeek.
Once you choose a plan, you’ll enter in your domain name, or choose your old one. This is where you’ll enter your blog’s name. For example, if your blog’s name is: Travel In Europe, you’d enter that as the address like the example below, no spaces:
It will also to check to make sure that domain is available. If not, no worries! Just come up with a different variation, SiteGround will also give you some ideas of what to use. Once you choose a domain, you’ll create an account and enter in your contact information and payment. I recommend using the “.com” since it’s just easier for people to remember.
At any point, if you get confused you can always click “Live Chat” and talk to someone immediately! Or, you can also call the phone number listed at the top right.
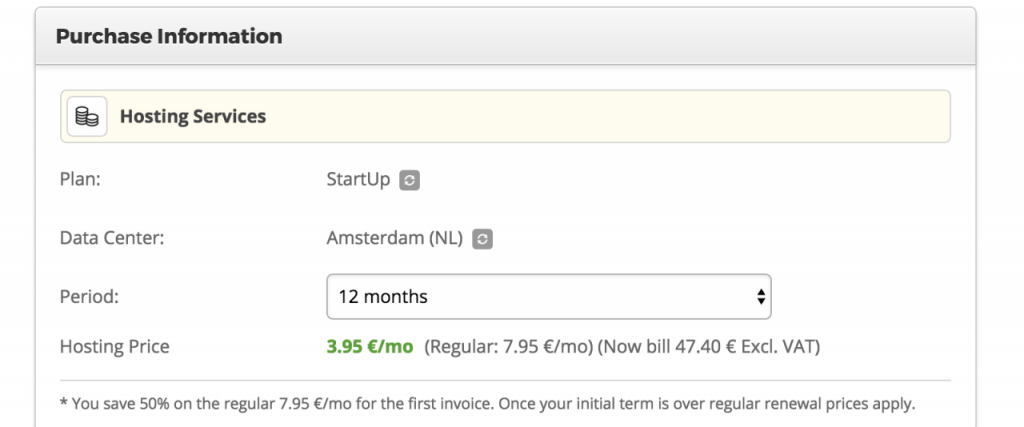
On the bottom, you’ll see your total payment. If you’d like to just pay month to month, you can change that under “hosting services”:
Once you complete this step, you’ll get a confirmation in your inbox that you’ve set up your blog- virtual high five!
Step 3: Install WordPress
Now that you have your domain and hosting, it’s time to install WordPress. This can sound intimidating, but I promise, it’s not! SiteGround also has a Wizard that helps you along the process. You have two options: you can do it yourself, or you can let SiteGround do it for you. I’m going to explain both.
Have SiteGround set it up for you:
Go ahead and go to your SiteGround Customer Area, when you do, you’ll get a pop-up asking if you’d like to have WordPress preinstalled on your account. Click that option and click “proceed.”
Next, you’ll enter your login details for WordPress. This is your admin email, username, and password.
Choose a WordPress theme (I’ll give you options for design and more below!) So just pick one and get to set up.
Lastly, you will see a quick summary of your WordPress installation, including from where to access your admin area, your username and your password.
You’ll get a confirmation email that your WordPress is installed and ready to go:
Set Up WordPress on Your Own:
Like I mentioned, you can also set this up on your own! So to do so, log into SiteGround and click on “My Accounts” then click the red button on the top left that says “Go to cPanel”, it looks like this:
Now, click on “WordPress Installer” as I circled in pink below:
Now click on the left button near the top, that says “Install”
Fill out all the blank fields with your information. You can leave the protocol as “http://”, choose your domain from the drop down, you can leave the directory blank. Write your Site Name, your Site Description is like your tag line. For example – a travel and lifestyle blog. Choose a username and password and the email you used to sign up with. Choose you site language and a theme. You can choose a theme here, or you can upload one later. I like themes from Restored 316. That’s what I currently use on my blog.
Once you’ve add all your info, click “Install”.
Now, you are ready to go! Use that username and password you created to login to your WordPress blog. Go to http://www.YOURNEWDOMAIN.com/wp-admin and enter in your login details.
Log in, you are READY to post!! Whooo hoo!!!
To review:
- Decide on a blog and a name
- Set up hosting and domain with SiteGround
- If you need help moving your site, help with design (or stuck with anything WordPress Related) I suggest hiring WP Help
Design it
A lot of bloggers get hung up on this, so have no fear. MANY of us struggle here. And it's okay! Realize that it takes some time getting used to. When I set out to design my site I had exactly 0 experience. And I think my blog design turned out great. So I'll walk you through it- we are in this together!
With WordPress, we install a “theme” to make our blog look pretty. This theme is really how your blog looks- the fonts, colors, sidebar, etc. You have two options: free or paid for theme.
Free themes are a great place to start if you’re a beginner blogger, but they will lack some of the tools a paid theme gives you. If you have the extra money to invest, then go for a paid theme. But if you want free, check out what WordPress has to offer, or check out these free options from Color Lib.
You can try a free theme for a month or so and get used to the platform. You can use one of the free themes WordPress has pre-installed under the “appearances” and “themes” tabs. Just click customize to switch themes.
I am not a web designer, nor do I have the time to learn a whole new web language (who does?!) so I go with Genesis Framework. Think of this as the building blocks for your website. I recommend Genesis because it really is one of the most popular and works with most lovely themes you'll find. It's also the fastest and most powerful tool out there. I should know because I've tried a few others. Now, to make it pretty, I chose the Glam child theme by Restored 316 Designs, which gives me all of the visual elements of my blog.
If you don't see something you like there I suggest checking out CreativeMarket. They have a wide range of options and prices too.
Remember, your blog design is the first thing someone sees, so keep it simple. Don't focus on clutter. And it doesn't need to be perfect immediately!
If you're like me, you've lurked on some LOVELY blogs and you want to know: what theme are they using? GUESS WHAT?! There is a tool that will tell you. It's literally called “What WordPress Theme Is That” and you can pop in the url of the blog and it will tell you! Now, some blogs are fully customized, meaning it won't tell you what theme, but it is still interesting to see what many use.
To make things easier, I suggest using Genesis Framework, choosing a lovely design from Restored 316.
Now that you have a theme, let's customize it. The left hand side of WordPress is where you can add pages and change your blog’s appearance. You might want to add some pages first. To do so, go to “Pages”, click on the top to “Add New” and name your page, and add in some relevant information.To add a new post, again go to the left side and click on “Posts” > “Add New.” Here, you cna type, add images, video, and more. On the top right you’ll see “Visual” or “Text.” You’ll most likely be in Visual most of the time. But, if you’d like to add in HTML code (say, a blog button or any script) you will click on HTML to add in that code (here’s a post on using HTML).
My suggestion is to pick a theme for now, it doesn't need to be perfect. The reason being is that WordPress very easily allows you to change up your site and make it your own. If you get really really stuck or just don't want to deal with it at all, I suggest using WP Help. They are awesome and will design your site for you.
No matter what you choose, keep it simple and easy. Remember, you can ALWAYS change it if you need!


